
Question
How to configure Windows Authenticode code-signing with Azure Key Vault?
Answer
Microsoft's "Authenticode" program for code-signing Windows executables helps end users verify the authenticity of an .exe file. Signing your installer is strongly recommended. It reduces SmartScreen / "unknown publisher" prompts, and improves compatibility with some antivirus software.
Azure Key Vault is a Microsoft cloud service offering HSM-backed key storage that meets current and upcoming Authenticode security requirements. It is the only supported Authenticode signing method on Comet-Hosted.
Some commercial Authenticode certificate providers can provision certificates directly into Azure Key Vault:
- GlobalSign: Certificates for Azure Key Vault
- TrustZone: EV code signing certificate in Azure
- Microsoft: Partnered CA providers
Below is the full walkthrough, using DigiCert/GlobalSign-style non-partnered CSR flow as the general case. If your CA is a Key Vault-partnered CA, some steps are simplified. See the integration guide your CA provides.
Step 1: Create an Azure Key Vault
- Sign in to the Azure portal.
- Select Create a resource, search for Key Vault, and choose Create.
- Give the vault a unique Name, choose your Subscription, Resource group, and Region.
- On the Recovery options tab, enable purge protection (recommended).
- Select Review + create, then Create.
-
Once deployed, note the Vault Name and Vault URI (e.g. `https://your-vault.vault.azure.net/`) — you'll need these later.
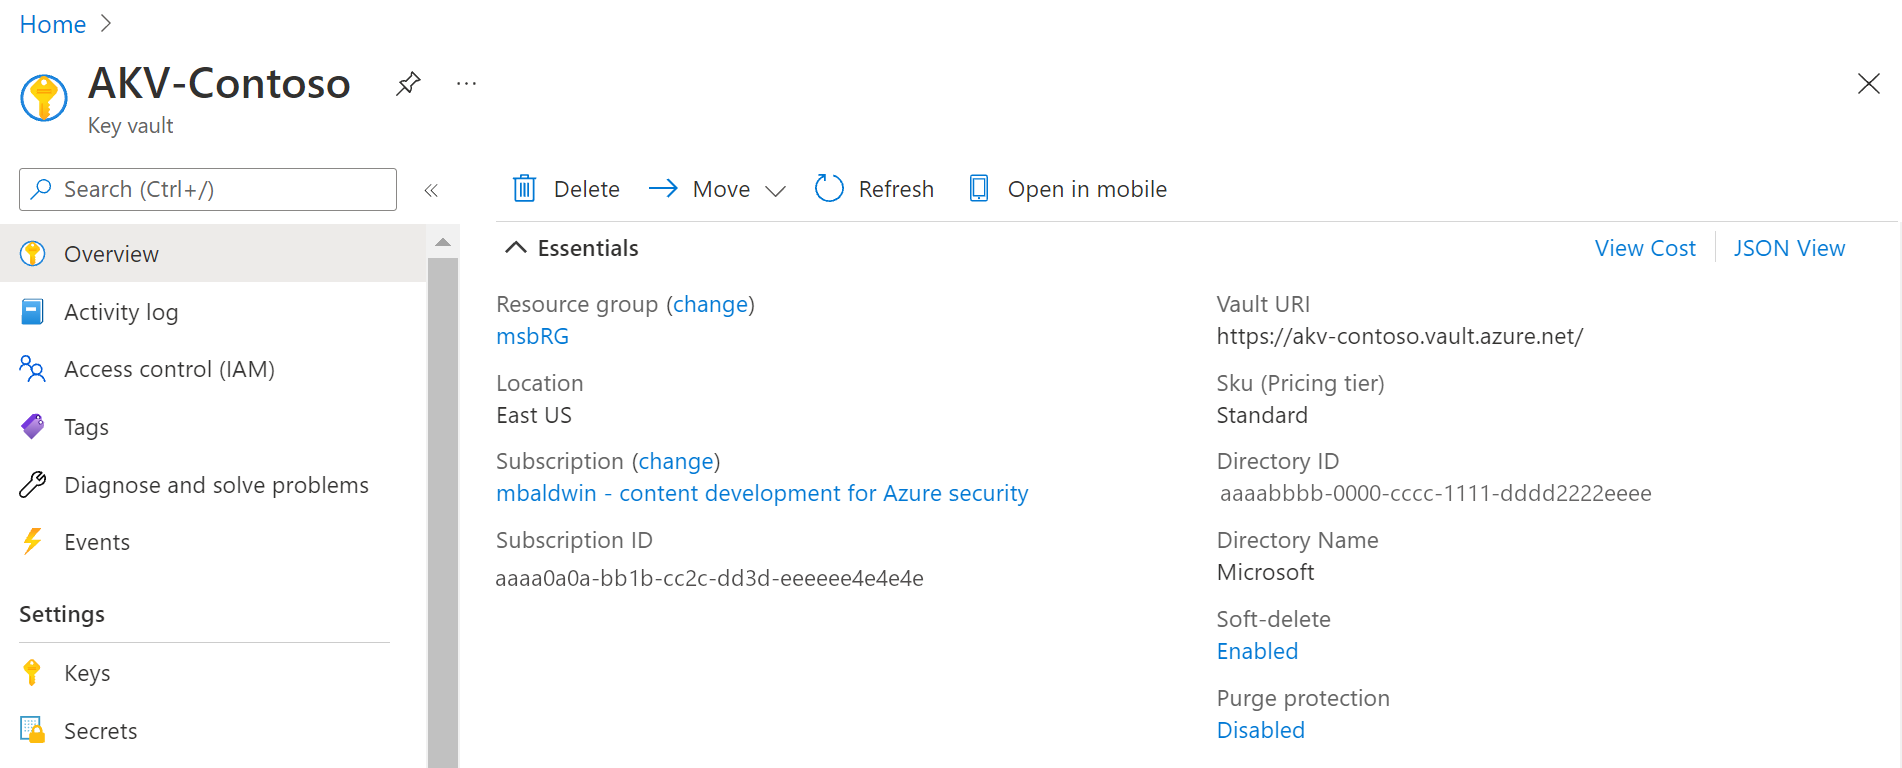
Key vault properties after creation
Full Microsoft guide: Quickstart: Create a key vault using the Azure portal
Step 2: Generate a Certificate Signing Request (CSR) in the Key Vault
- Open your Key Vault, select Certificates in the left menu.
- Select Generate/Import.
- On the "Create a certificate" screen:
- Method of Certificate Creation: Generate
- Certificate Name: a unique name, e.g. CometCodeSigningCert
- Type of Certificate Authority (CA): Certificate issued by a non-integrated CA (unless using a Key Vault-partnered CA)
- Subject: e.g. CN=Your Company Name
-
Select Create.
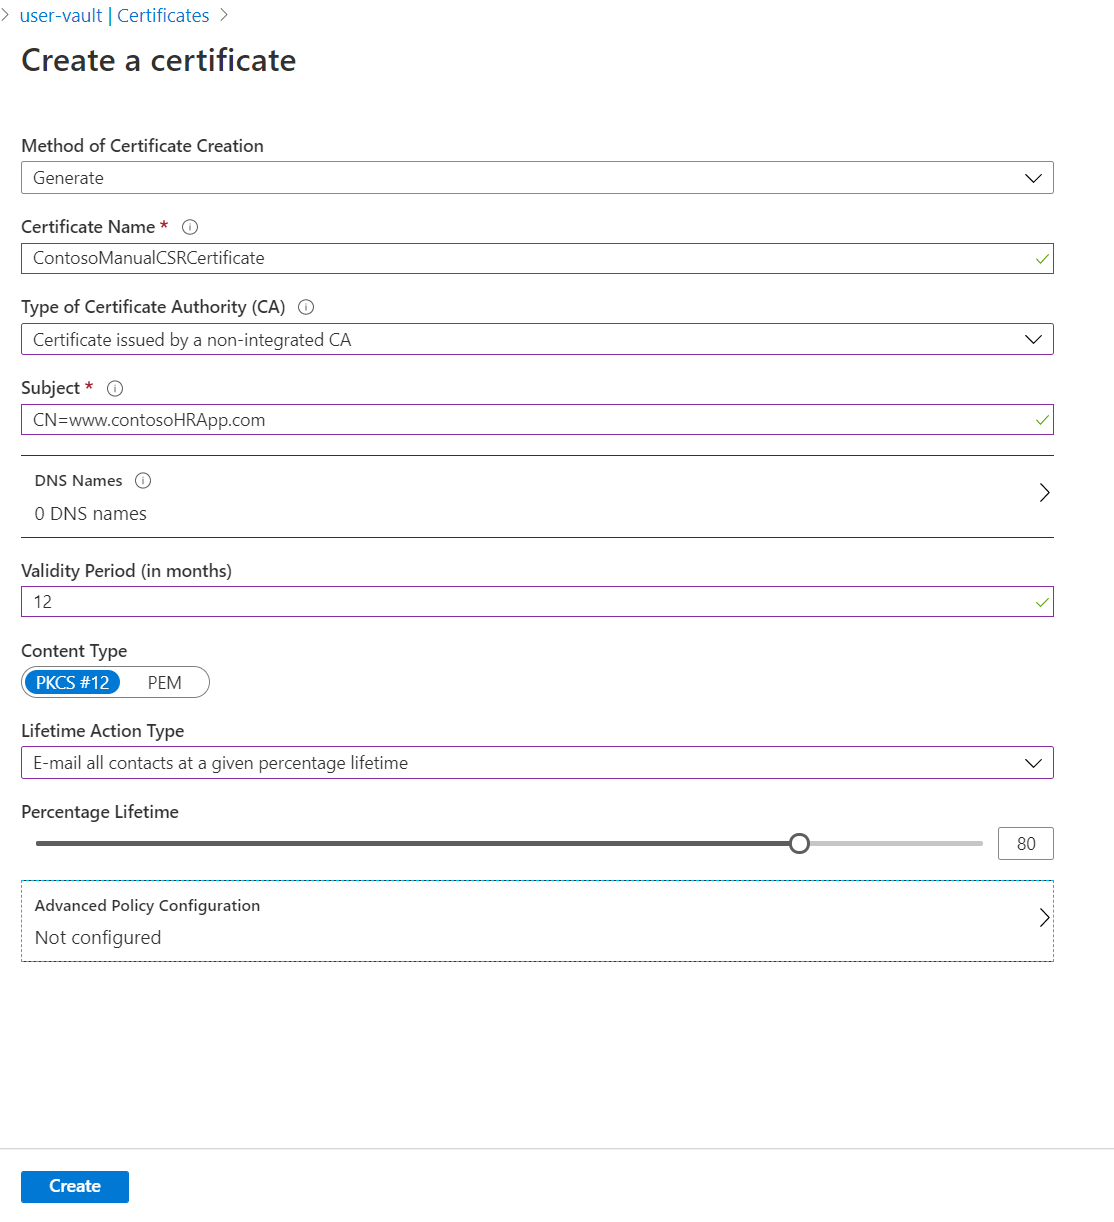
Certificate properties screen - The new certificate will show as disabled (it isn't issued yet). Select it, then open the Certificate Operation tab.
-
Select Download CSR to get the .csr file.
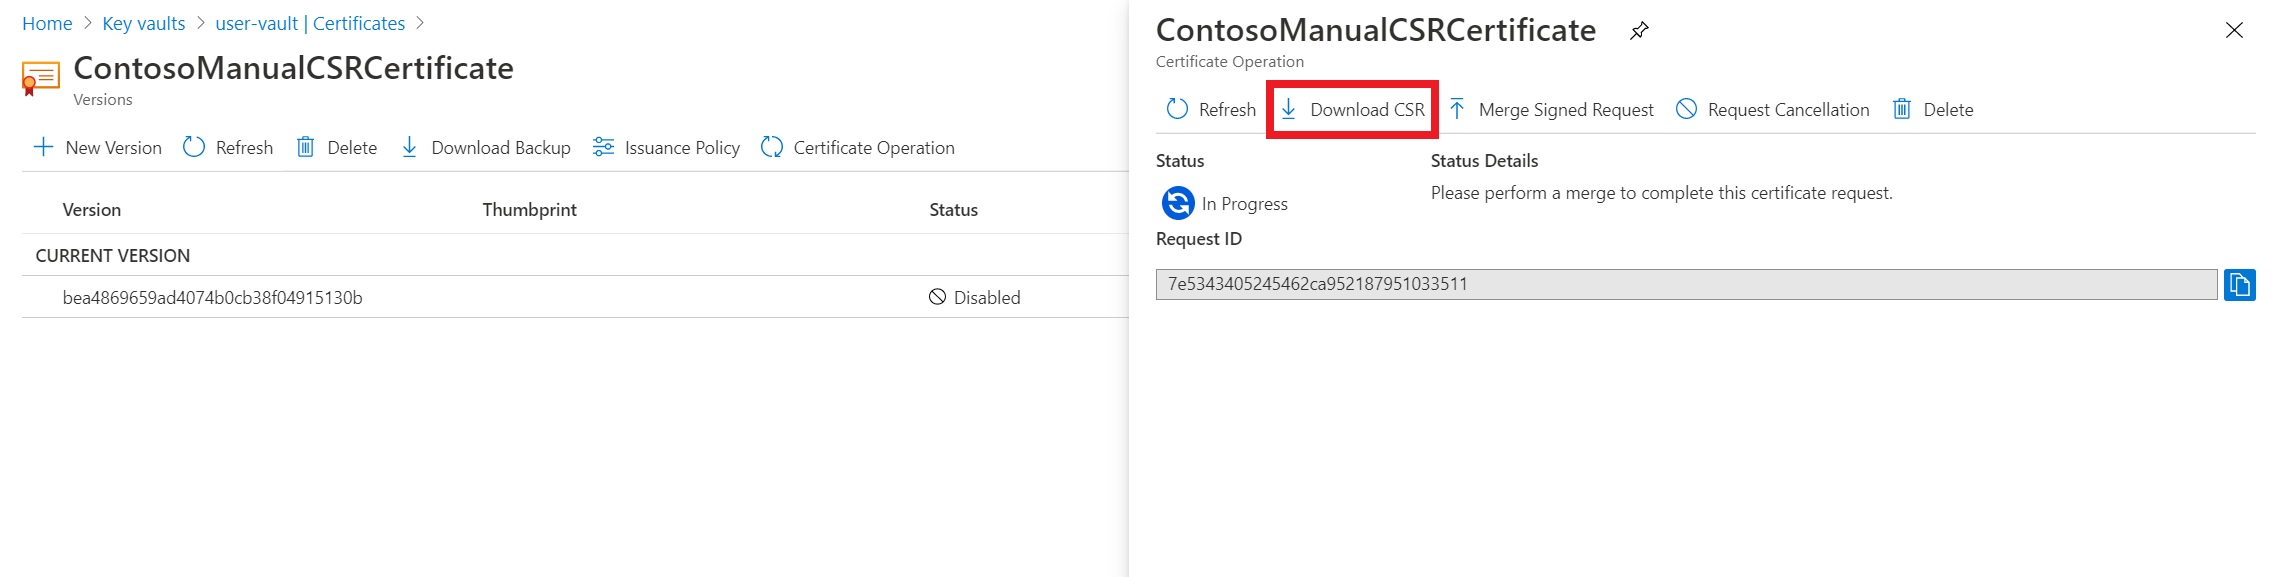
Download CSR button - Send the CSR to your chosen commercial CA (GlobalSign, DigiCert, etc.) to be signed. This typically requires an organization validation (OV) or extended validation (EV) process. Follow your CA's instructions.
- Once the CA returns the signed certificate, go back to the Certificate Operation tab and select Merge Signed Request to complete the certificate in Key Vault.
Full Microsoft guide: Create and merge a certificate signing request in Key Vault
Step 3: Register an Azure AD (Entra ID) application for Comet
Comet needs its own application identity to authenticate to your Key Vault.
- Sign in to the Microsoft Entra admin center.
- Go to Entra ID > App registrations > New registration.
- Give it a name, e.g. Comet Code Signing.
- Under Supported account types, choose Accounts in this organizational directory only.
- Leave Redirect URI blank (not required for this scenario).
-
Select Register.
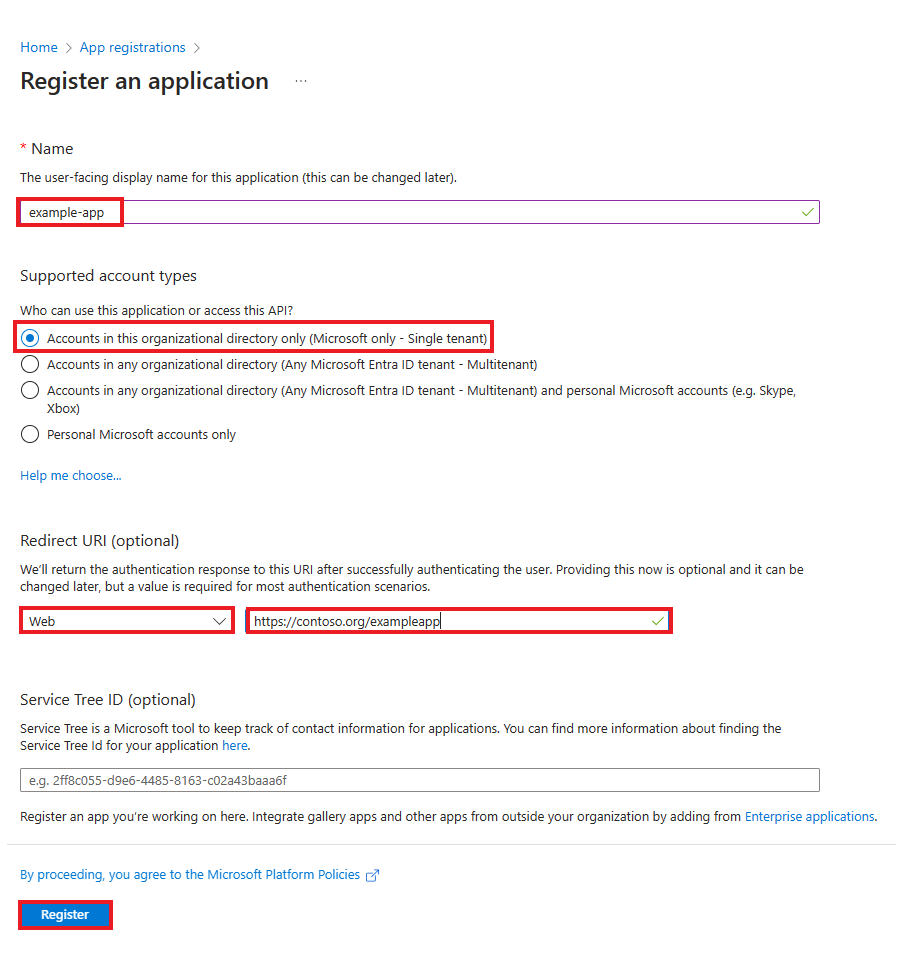
Application registration page On the app's Overview page, copy and record:
- Application (client) ID - this is the Application ID Comet asks for,
- Directory (tenant) ID - this is the Tenant ID Comet asks for.
Full Microsoft guide: Register a Microsoft Entra app and create a service principal
Step 4: Create a client secret for the application
- In your app registration, select Certificates & secrets.
- Select the Client secrets tab, then New client secret.
- Add a description and choose an expiry duration.
- Select Add.
- Immediately copy the secret's "Value". This is shown only once. This is the Application Secret Comet asks for.
Step 5: Grant the application access to the Key Vault
- In your Key Vault, select Access control (IAM).
- Select Add > Add role assignment.
- Under Role, select Key Vault Certificates Officer, then Next.
- Under Members, choose User, group, or service principal, select your Comet Code Signing app (or the name you chose), then Review + assign.
-
Repeat steps 2–4, this time assigning the Key Vault Crypto Officer role.

Assigning roles via Access control (IAM)
Full Microsoft guide: Provide access to Key Vault with Azure RBAC
Step 6: Enter the details into Comet
Back in the Comet Management Console, open the system settings, open "Backup Agent Branding". On the bottom of the page, open the "Codesigning" menu, and set the type to Azure Key Vault. Enter:
| Field | Where to find the value to enter |
| Azure Key Vault name | The "Name" you gave the vault in Step 1 |
| Certificate name | The "Certificate Name" you gave in Step 2 (e.g. CometCodeSigningCert) |
| Application ID | The "Application (client) ID" from Step 3 |
| Application Secret | The "Value" copied in Step 4 |
| Tenant ID | The "Directory (tenant) ID" from Step 3 |
Comments
Please sign in to leave a comment.